Restaurant Receipt Template: Create Clear Receipts
Learn to master a restaurant receipt template with practical fields, tax notes, and digital formats for compliant, professional receipts.
A professional restaurant receipt template is so much more than a simple proof of purchase. It’s a workhorse for your brand, a trust-builder for your customers, and a critical piece of your day-to-day operations. When done right, it provides a crystal-clear record that makes life easier for everyone and ensures your business looks sharp from the moment a guest walks in to the moment they leave.
Why a Polished Receipt Is Your Restaurant's Secret Weapon
Ever thought of a receipt as just a scrap of paper? It's time to reconsider that. This little document is often the very last physical thing a customer touches from your brand, making it a surprisingly potent marketing tool. A well-designed receipt doesn't just confirm a payment; it quietly speaks volumes about your restaurant's professionalism and meticulous attention to detail.

Think about it: for a small neighborhood café, a clean and branded receipt can give it the same polished feel as a high-end dining establishment. It elevates the entire experience, leaving a final, lasting impression of quality. It’s a small detail, but one that builds serious confidence and tells your guests they made the right choice.
Building Trust Through Transparency
Nothing creates friction like a confusing bill. A clear, itemized receipt stops potential disputes before they even start. When customers can easily track every charge, from the appetizer down to the extra side of sauce, it creates a powerful sense of transparency.
This is absolutely essential for business diners who rely on these slips for their expense reports. A messy, handwritten, or vague receipt is a headache they don't need. A professional one makes their life easier and your restaurant look good.
The data backs this up. One recent study found that 92% of customers trust businesses more when receipts include logos and contact information, a simple move that can boost repeat visits by as much as 15%. You can find more insights on building this kind of customer trust over at WordLayouts.com.
A great receipt is an extension of your hospitality. It should be as clear, thoughtful, and professional as the service you provide at the table.
Reinforcing Your Brand Identity
Don't forget, your receipt is a final piece of branding real estate. Every element—the font, the logo, the layout—contributes to how a customer remembers their meal. Using a custom restaurant receipt template is your chance to solidify that memory.
- Showcase Your Logo: This is a no-brainer. It instantly connects the transaction to your brand.
- Use Consistent Fonts: The typography should feel familiar, matching what guests see on your menu and website.
- Add a Thank You Message: A simple, personal touch goes a long way and ends the entire interaction on a genuinely high note.
At the end of the day, a polished receipt is a low-cost, high-impact tool that pays dividends in customer loyalty and smoother operations.
Nailing the Anatomy of a Professional Restaurant Receipt
A great restaurant receipt does more than just list charges; it’s a final piece of communication with your guest. Think of it as your last handshake—it needs to be clear, professional, and leave them feeling confident about their experience. It’s all about striking that perfect balance between providing every necessary detail and maintaining a clean layout that nobody has to puzzle over.
Let's break down the essential parts that every professional receipt needs to get right.
Start Strong: Your Header is Your Handshake
The top of the receipt is prime real estate. It's the first thing a customer glances at to confirm who they just paid. This is your chance to reinforce your brand and establish immediate legitimacy. A weak header without the right info can look unprofessional and create headaches for guests who need to expense the meal.
This section anchors the entire document. At a minimum, make sure you include:
- Your Logo: A simple visual that instantly connects the receipt to your restaurant.
- Business Name: Your official restaurant name, front and center.
- Physical Address: The full street address, city, and zip code are non-negotiable for validation.
- Contact Info: A phone number and website give customers a way to reach you and build trust.
- Tax ID Number: This is often a legal must-have, whether it’s a VAT, GST, or other local business tax ID.
See how the example above creates a clear hierarchy? The business name is prominent, and the supporting details are organized for a quick, easy scan.
To help you get started, here's a quick-reference table outlining the critical fields your template should include.
Essential Fields for Your Restaurant Receipt Template
This checklist covers the must-have and recommended components that make a receipt both professional and legally compliant.
| Section | Component | Purpose & Best Practice |
|---|---|---|
| Header | Logo & Business Name | Reinforces brand identity and clearly identifies your establishment. |
| Header | Address & Contact Info | Provides necessary location and contact details for customer records and trust. |
| Header | Date & Time | Establishes a precise record of the transaction for both parties. |
| Header | Receipt/Order Number | Unique identifier crucial for tracking, returns, or addressing customer service issues. |
| Body | Itemized List | Lists each item (food, drink, modifier) with its price. Best Practice: Use clear, descriptive names. |
| Body | Quantity & Price | Shows how many of each item was ordered and the cost per item. |
| Summary | Subtotal | The pre-tax total of all items. This should be a distinct, clear line. |
| Summary | Sales Tax | Clearly labels the tax amount. Best Practice: Include the tax rate (e.g., "Tax (8.25%)"). |
| Summary | Gratuity/Tip | Shows any tip added by the customer or an automatic gratuity. |
| Summary | Total | The final, all-inclusive amount charged. This is the most important number on the page. |
| Footer | Payment Details | Shows the payment method and last 4 digits of the card (e.g., "VISA ****1234"). |
| Footer | Server Name | Adds a personal touch and helps with internal tracking or resolving disputes. |
| Footer | Thank You Message | A simple, courteous closing to end the experience on a positive note. |
Getting these fields right from the beginning saves you—and your customers—a ton of potential confusion down the road.
The Heart of the Matter: The Itemized List
Right below the header is where you build transparency. This is the detailed breakdown of every single thing the guest ordered, and it needs to be crystal clear. Vague descriptions are a recipe for confusion and disputes.
Instead of just "Daily Special," be specific: "Pan-Seared Salmon Special." Don't lump things together. List every drink, every side, and every modifier on its own line with its price. For example, a burger with an add-on should look like this:
- Classic Burger - $15.00
- Add: Bacon - $2.00
This level of detail not only helps your guests understand their bill but is also incredibly valuable for your own inventory management and sales reporting.
The Bottom Line: The Financial Summary
This is where all the numbers come together, and it absolutely has to be perfect. The financial summary at the bottom is where guests look to understand the final cost, check the tax, and confirm their tip.
A confusing summary can quickly ruin an otherwise fantastic dining experience. Your goal here is zero ambiguity. Make the math simple and impossible to misinterpret.
A bulletproof summary always breaks things down into these distinct lines:
- Subtotal: The cost of all food and drinks before anything else is added.
- Sales Tax: The required tax, clearly labeled. Listing the rate (e.g., "Sales Tax (8%)") is a great touch.
- Gratuity/Tip: Any tip added by the guest or an auto-gratuity for a large party.
- Total: The final, all-in amount that was charged.
For a final layer of clarity, I always recommend adding a line showing how they paid, like "Paid via Visa **** 1234." It creates a complete, undeniable record of the transaction. If you're looking for inspiration, you can browse and customize a wide variety of restaurant receipt templates. A well-organized summary builds trust and makes sure no one leaves the table with questions.
Designing for Different Audiences: Guest vs. Kitchen
When a customer pays, your restaurant actually produces two different documents for that single transaction, and each one has a very specific job. The receipt you hand over to your guest is a branding and communication tool. The ticket that goes to the kitchen? That’s all about speed and accuracy when things get hectic. Thinking they're one and the same is a classic rookie mistake that can gum up service and leave guests scratching their heads.
The guest receipt is your final handshake. It’s a piece of your brand, so its design should match the quality of your food and service. This means a sharp logo, clean fonts, and a layout that’s a breeze to read. Everything from the paper quality to the final "Thank you for dining with us" should feel polished and wrap up their experience on a high note.
The kitchen order ticket (KOT), on the other hand, is a tool, plain and simple. Its only job is to tell the chefs what to make, quickly and without any room for error. Looks don't matter here; function is king.
This quick breakdown shows the essential parts of a standard guest receipt.
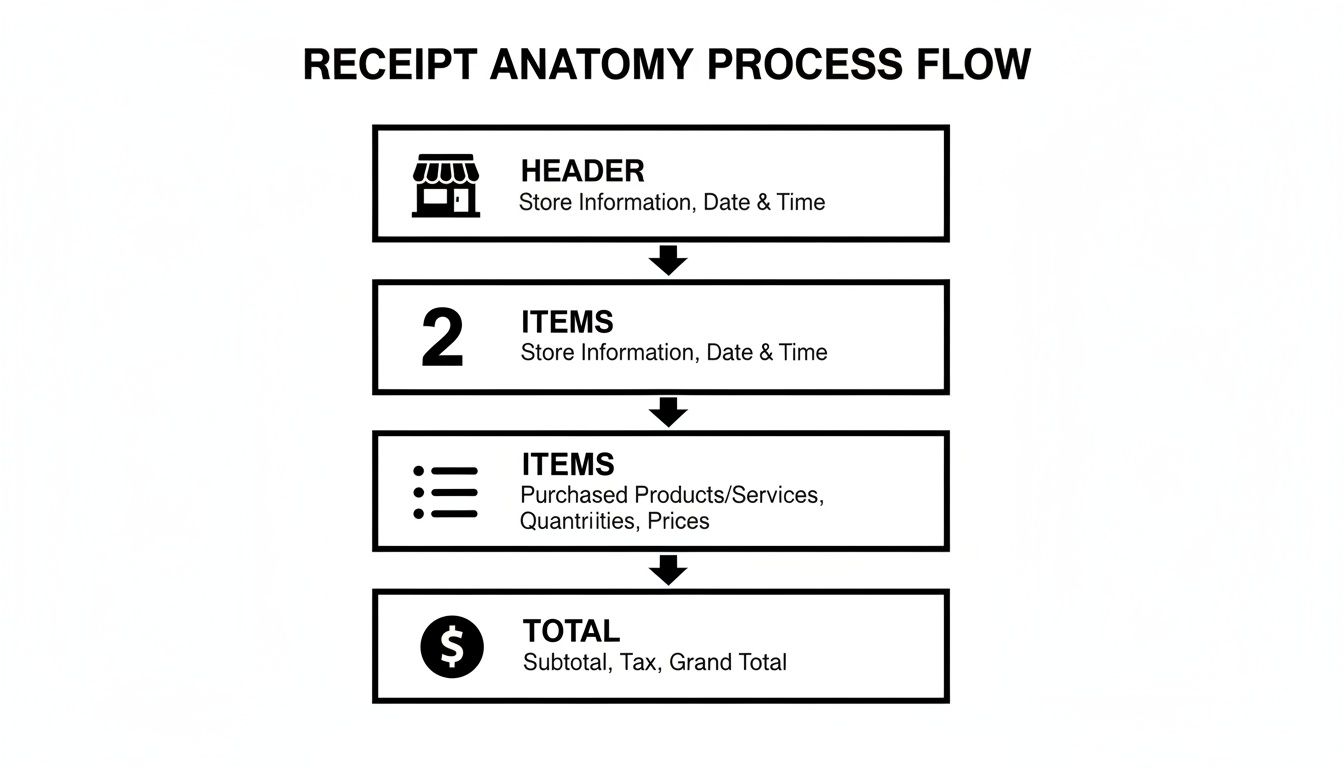
As you can see, a good guest receipt has a logical flow, walking the customer through every detail of their bill from top to bottom.
The Kitchen Order Ticket Blueprint
For the KOT, the rules of the game change entirely. When the kitchen is slammed, readability and speed are all that matter. Tiny fonts and crammed layouts are a recipe for disaster.
A KOT isn't a bill; it's a command. The line cooks need to understand it in a single glance amidst the noise and heat of a busy service.
To make your kitchen ticket truly effective, laser-focus on these elements:
- Big, Bold Fonts: Stick with a simple, easy-to-read sans-serif font. I’d recommend starting at size 14pt or larger so it can be seen from a few feet away.
- Unmistakable Modifiers: Special requests are where orders go wrong. Use all caps, indentations, or even asterisks to make things like "NO ONIONS," "ALLERGY: PEANUT," or "SAUCE ON SIDE" jump off the page.
- Logical Pacing: Group items by course—appetizers, then mains, then desserts. This simple step helps the kitchen team pace the meal correctly and fire dishes at the right time.
Crafting the Perfect Guest Receipt
Your guest receipt needs to strike a careful balance between providing necessary detail and maintaining a clean design. It has to contain all the legally required financial info, but you can’t present it in a way that feels like a tax form. A well-organized layout prevents that awkward moment when a guest gets confused by the final bill.
Here are a few best practices I've picked up for creating a customer-friendly receipt:
- Brand the Header: Your logo, restaurant name, address, and phone number should always be right at the top. It reinforces your brand and makes it easy for guests to get in touch.
- Itemize Everything Clearly: Every single thing a guest ordered, from drinks to that side of ranch, needs its own line with a clear price. Ambiguous charges like "Miscellaneous" or "Open Food" look suspicious and can erode trust. If you want to dive deeper into this, check out our guide on the itemized receipt template.
- Make the Total Pop: The final amount due should be the most prominent number on the entire receipt. Using a bold font or making it a point size larger ensures there's absolutely no confusion.
The good news is you don’t have to compromise. Using a tool like Receipt Maker, you can easily create and save separate templates for both your guests and your kitchen, ensuring your front-of-house looks professional while your back-of-house runs like a finely tuned machine.
Getting Taxes, Tips, and Payments Right
The bottom of the receipt is where the money is, and it's where trust is built or broken. Get the tax wrong by a few cents, or make the tip line confusing, and you can sour a great meal right at the last moment. A solid restaurant receipt template clears up any confusion and makes sure every transaction is handled perfectly.
This isn't just about keeping customers happy—it’s about staying on the right side of the law. In the EU, for example, VAT-compliant receipts are an absolute must for any B2B transaction. Businesses there are responsible for their piece of the roughly €1.8 trillion in annual VAT collections, so accuracy is everything. You can dig into more global receipt standards over at ExpressExpense.com.
Handling Taxes with Precision
Your sales tax, VAT, or GST needs to be spelled out clearly. There's no room for error here. The best way to do this is to show not just the final tax amount, but also the percentage used to calculate it. This kind of transparency is great for customers and a lifesaver for anyone needing to expense the meal.
Make sure your template has a clean, dedicated line for taxes that includes:
- The Right Label: Use "Sales Tax," "VAT," or "GST," depending on where you operate.
- The Tax Rate: Putting the rate in parentheses—like "Tax (8.25%)"—answers a customer's question before they even think to ask it.
- The Total Tax Amount: The final, calculated number.
This simple detail adds a layer of professionalism and makes bookkeeping easier for you and your customer. For more on that, take a look at our guide on how to organize receipts for taxes.
Getting the math right every single time is the bedrock of a trustworthy receipt. Your template's job is to make tax and tip calculations completely foolproof.
Making Gratuity Simple and Clear
Tipping should feel like a thank you, not a math test. A clunky, confusing tip section is frustrating for guests and can end up costing your staff money. Your receipt needs to handle every tipping preference with ease.
A well-designed tip section usually offers a few options:
- Pre-calculated Suggestions: Show a few suggested tip amounts (like 18%, 20%, and 22%) to take the guesswork out of it.
- A Blank Tip Line: Of course, always include a line for guests who want to add a custom amount.
- A Final Total Line: Give them a clear spot to write in the new grand total after adding their tip.
This setup gives the customer control while heading off those all-too-common calculation mistakes.
Showing Payment Methods and Splitting the Bill
Finally, a good receipt serves as proof of payment. It should clearly state how the bill was paid, whether it was "Paid via Visa ****4321" or "Cash." This little detail is your best friend when it comes to preventing chargebacks or clearing up any payment disputes down the road.
And what about the dreaded split check? This can turn into a logistical nightmare if you're not prepared. When a table asks to split the bill, each person needs their own receipt reflecting exactly what they paid for. Your system has to be able to print separate, itemized receipts for each payment. It shows you’re organized, on top of things, and respectful of your customers' needs.
From Thermal Rolls to Digital Sends: Choosing Your Receipt Format
Alright, you’ve put in the work and designed the perfect receipt template. Now for the final, crucial step: how are you actually going to get it to your customers? This isn't just a technical detail; the format you choose—whether it's a classic paper slip from a thermal printer or a sleek digital file—is part of the customer experience.
Each format serves a different purpose. Think about the tactile, familiar feel of a thermal printout versus the sheer convenience of a PDF zapped straight to an email inbox.

This choice is all about function. A business traveler on an expense account is going to love you for sending a clean, full-page PDF. On the other hand, for a busy quick-service spot, a simple, narrow thermal slip is all that's needed. Getting this right adds that last little touch of professionalism to every transaction.
Mastering the Classic Thermal Print
There's something satisfying and authentic about that crisp, narrow receipt spitting out of a thermal printer. For most restaurants, this 80mm format is the bread and butter. But getting it to look right is more than just shrinking your design; the magic is in the details.
To nail that authentic thermal print look, you'll want to focus on a few key things:
- Go Monospaced: Use a dot-matrix or a specific thermal-style font. These have fixed-width characters that perfectly mimic real POS printers, giving your receipt an instantly recognizable, professional vibe.
- Keep It Simple: Thermal paper is narrow, so a clean, single-column layout is your best friend. Avoid trying to cram in complex tables or side-by-side elements—it will just end up looking messy.
- High Contrast is Key: Black text on a white background. That's it. This ensures maximum readability, just like a real-world printer would produce.
This format is the go-to for standard dine-in service where customers expect a physical copy of their bill.
The Professional PDF for When It Needs to Be Official
Sometimes, a customer needs a receipt for more formal reasons, like a detailed expense claim or their own business bookkeeping. In these cases, a standard PDF is the gold standard. It’s a vector-based document, not a simple image, which means it looks sharp and professional whether it's viewed on a screen or printed on a full-size sheet of paper.
This is the perfect option for corporate clients or any guest who asks for an emailed copy for their records. Sending a clean, full-page PDF reinforces your restaurant's legitimacy and, frankly, makes your customer's life a lot easier.
The modern dining experience is increasingly paperless. Offering a digital option isn't just a nice-to-have anymore—it's quickly becoming an expectation for a huge chunk of your customer base.
Embracing Digital Receipts with PNG and JPEG
The push for paperless everything is undeniable. By offering digital receipts as common image files like PNG or JPEG, you're meeting your customers where they are. These formats are incredibly easy to send via email or text, letting people save a copy directly to their phones with zero fuss.
Younger diners, in particular, have come to expect this. In fact, some studies show that 85% of millennials prefer digital receipts. This shift has fueled a massive 40% surge in the adoption of QR code-based templates since 2020. You can find more fascinating insights about receipt template trends and how they're changing customer behavior.
Fortunately, using a tool like Receipt Maker lets you easily export your custom restaurant receipt template into any of these formats. You’ll be ready for whatever your customer asks for.
Got Questions About Restaurant Receipts? We've Got Answers.
When you're designing a restaurant receipt, a few questions always seem to pop up. Whether you're worried about legal compliance or just trying to get the look right, having the correct information is key. Let's walk through some of the most common questions we hear from restaurant owners and freelancers.
What Absolutely Has to Be on a Restaurant Receipt?
This is the big one, and thankfully, the answer is pretty clear. To keep everything above board for legal and tax reasons, your receipt needs a few non-negotiable details.
Think of it as a checklist. At a bare minimum, you must include your restaurant's full name and address, your tax ID number (like a VAT or GST number), the date of the transaction, and a detailed financial breakdown.
That breakdown needs to show every single item ordered with its price, the subtotal before tax, the tax amount itself, and the final grand total. Missing any of these can cause serious problems, whether it's during a tax audit or just for a customer trying to expense a business lunch. For instance, in many parts of the world, an itemized VAT receipt is mandatory for businesses that want to claim back taxes, so accuracy is everything.
How Can I Make My Receipt Look Like It Came from a Real Thermal Printer?
Getting that authentic, slightly pixelated thermal printer look is all about the fine details. The single most important choice you'll make is the font. You need to use a monospaced font—think dot-matrix or a typeface specifically designed for thermal printing. These are what give you the classic character spacing and feel of a real POS printout.
Beyond the font, you'll want to set your template to a narrow width. The industry standard is 80mm, which matches most point-of-sale printers. To really sell the effect, consider adding small but functional details like a simple barcode or a QR code at the bottom.
The real goal here is to create something that looks and feels just like it was printed on the spot. It’s the small things, like font and layout, that make it convincing.
Is It Okay to Recreate a Lost Receipt for an Expense Report?
Yes, absolutely. People lose receipts all the time, and recreating one for an expense report is a very common—and perfectly fine—practice, as long as every piece of information you enter is 100% accurate. A freelancer might misplace a receipt from a client dinner, or an employee’s paper copy gets destroyed. It happens.
Using a tool like a receipt maker, you can easily input the correct date, every item purchased, their prices, and the exact tax and tip. This generates a perfectly valid substitute for your expense filing. Just make sure you double-check your company's expense policies to stay in compliance.
Do Receipt Rules Change Depending on the Country?
They definitely do. Tax laws and consumer rights are different everywhere, and that directly affects what's required on a receipt.
You'll see significant differences from one place to the next:
- Canada: You must clearly show a breakdown of GST/HST.
- European Union: VAT information is highly regulated and must be displayed in a specific way.
- Australia: For any purchase over a certain dollar amount, a receipt is legally required.
Before you finalize your template, it’s smart to spend a few minutes researching the specific rules for your city, state, or country. A good receipt maker will let you easily change tax labels (VAT, GST, Sales Tax) and rates to make sure you're compliant, no matter where you do business.
Ready to skip the hassle and design a professional, fully customized receipt in just a few minutes? With Receipt Maker, you get dozens of templates and all the tools you need to create the perfect document. Create your free restaurant receipt now!